Model
Model tab allows you to upload customized models using Unified Modeller/SIOME. Following activities are performed:
- Once the user defined data points are mapped with the existing data points and deployed to OPC UA server, the same will be accessible/visible in OPC UA client application.
- Browse for XML based model files with namespace.
- Validates the Model file against the OPC UA Foundation Model schema v1.4.0, and adds the Model.
To configure the Model in the OPC UA Server Configurator, perform the following steps:
-
In the Model tab, ensure to check "Use custom information model".

-
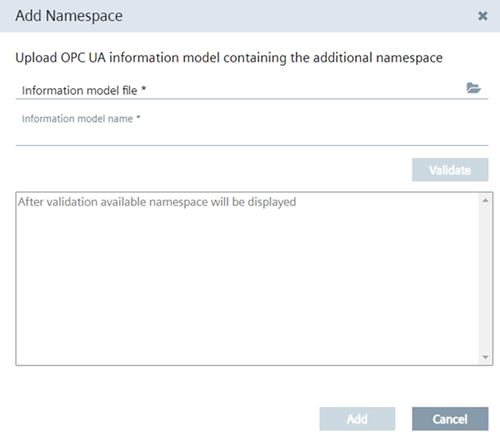
Click
 to add namespace.
The "Add Namespace" pop up allows you to browse for the xml based Model file.
-
Click "Validate".
-
Upon successful validation, click "Add".
The Model with namespace gets added in the Model area.
Note- You can browse for one Model file only at a time. If the Model is already deployed,browsing for a new Model file will replace the existing Model file.
- You can use a customized Model file or the the ones available from existing data providers.
- A Model can be associated with multiple namespaces.
- When you uncheck "Use custom information model", you will be allowed to only deploy configurations when atleast one data point is selected. If none is selected then OPC UA configurator displays error. When no datapoints are selected then the "Deploy" tab will be disabled.
- Once you switch back from customized model to the standard data provider model, you need to rebrowse the Edge OPC UA Server.