Integration Guide
This guide will walk you through the process of enabling your device as an Industrial Edge Device with all functionalities. This is done by integrating the Industrial Edge Runtime into your firmware. Your device will be capable of running Edge Applications and enhanced Device Management via the Industrial Edge Management.
Prerequisites
- Access to the Industrial Edge Hub (with enabled Device Builder Features)
- Physical or virtual hardware with root access (selection see below)
HW and SW Selection
Before you start to integrate the Industrial Edge Runtime, the physical hardware or virtual device has to be selected. The system needs to have sufficient hardware resources and a compatible operating system. In this tutorial, it is recommended to start with a virtual machine and an Ubuntu image. The Ubuntu desktop image can be downloaded here.
For the hardware configuration, we recommend at least:
- 1 vCPU-Core
- 512 MB RAM
- 1 (virtual) network card
Further information about the most important points for selecting the right hardware can be found in the prerequisites subsection.
Install Dependencies
Note Ensure your Edge Device is connected to the internet so that dependencies can be downloaded from public repositories during the installation process.
Note Please note that the edge-iot-core-container_*.deb only supports nginx version < v1.26.
Download IEDK Packages
The IEDK packages are available for arm64 and x86-64 processor architectures. They can be downloaded from the Download Software section in the Industrial Edge Hub. Make sure to download the right packages for your hardware.
China Region
For users in China region please download from Industrial Edge Hub China.
Configure Capabilities
You can optionally adapt the capabilties to enable or disable device management functionalities. For detailed information, see here.
Install Industrial Edge Packages onto the Edge Device
Copy the dowloaded IEDK packages to your development machine and unzip them. Afterwards, you can execute following commands from inside the folder.
Advanced Installation
Execute following commands inside the IEDK folder for installing the components.
sudo cp capabilities.json /etc/

sudo apt install -f -y --assume-yes --allow-downgrades \
    ./redsocks*.deb \
    ./edge-manager_*.deb \
    ./edge-iot-core-container_*.deb \
    ./dm-network_*.deb   \
    ./dm-ntp_*.deb  \
    ./dm-onboard_*.deb \
    ./dm-system_*.deb
sudo cp capabilities.json /etc/

sudo apt install -y --assume-yes --allow-downgrades \
    ./edge-manager_* \
    ./edge-iot-core-container_* \
    ./dm-network_* \
    ./dm-ntp_* \
    ./dm-onboard_* \
    ./dm-system_* \
    ./redsocks_0.5-3_debian11_arm64.deb
Check Installation
After the installation is completed, the installation status can be checked with the following command:
sudo docker ps
The output should show the edge-iot-core-container in an up state. You should see something similar to this screenshot:

Note Your device is now capable of all Industrial Edge functionalities like device management.
You can now continue with the onboarding.
Installation Scripts
If you want to use the scripts we provide just follow these instructions:
- Ensure that the Edge Device is switched on and connected to the internet because some extra dependencies, for example Docker, must be downloaded from public repositories during the installation process.
- Download one of the provided installation scripts:
- x86-64 based device (Ubuntu 20): Installation script for Ubuntu desktop image x86-64
- arm64 based device (Ubuntu 20): Installation script for Ubuntu desktop image arm64
- x86-64 based device (Ubuntu 22): Installation script for Ubuntu desktop image x86-64
- arm64 based device (Ubuntu 22): Installation script for Ubuntu desktop image arm64
- Mentor Industrial OS IPC 2.1.0: Installation script for Mentor Industrial OS IPC 2.1.0
-
Run the downloaded script with the following command as root user:
bash install_script_4_*.sh
Resource Management
Industrial Edge's Resource Manager has been tested on Debian 11 Bullseye and Debian 12 Bookworm. For Debian 11, make sure to include bullseye-backports in sources.list as explained below. If you want to use the scripts provided by us, follow these instructions:
-
Ensure that the Edge Device is switched on and connected to the Internet because some extra dependencies, for example Docker, must be downloaded from public repositories during the installation process.
-
Download one of the provided installation scripts:
- x86-64 based device (debian-11-bullseye): Installation script for Debian 11 Bullseye x86-64
-
arm64 based device (debian-11-bullseye): Installation script for Debian 11 Bullseye arm64
These scripts need to be executed with
sudo. You can run them as shown in the example below. If your user is not included in the sudoers file, add it. Alternatively, you can become root using thesu -command and directly run the scripts.sudo bash install_script_4_debian11-bullseye.sh # x86-64 based devices sudo bash install_script_4_debian11-bullseye_arm.sh # arm64 based devicessu - bash install_script_4_debian11-bullseye.sh # x86-64 based devices bash install_script_4_debian11-bullseye_arm.sh # arm64 based devices -
If the CPU plugin is to be installed on the system, the following steps should be taken after running the installation script. These steps will ensure that the base system is real-time capable, a prerequisite for CPU isolation. For more detailed information, see the Resource Manager page.
# Add bullseye-backports repo
sudo tee /etc/apt/sources.list.d/bullseye-backports.list << EOF
deb http://deb.debian.org/debian bullseye-backports main
deb-src http://deb.debian.org/debian bullseye-backports main
EOF
# Update the apt package index sudo apt update# Install linux-image-rt-amd64 and linux-perf from bullseye-backports repo sudo apt install -y -t bullseye-backports linux-image-rt-amd64 linux-perfIf you are using arm64-based Debian 11 Bullseye, you should use the following command instead of the one above.
# Install linux-image-rt-arm64 and linux-perf from bullseye-backports repo
sudo apt install -y -t bullseye-backports linux-image-rt-arm64 linux-perf
# Install gawk, python3-linux-procfs, python3-pyudev, virt-what and tuned from bullseye-backports repo sudo apt install -y -t bullseye-backports gawk python3-linux-procfs python3-pyudev virt-what tunedFinally, install the actual plugin for the Resource Manager:
cd resource-management/packages
sudo apt install -y ./ie-cpu-resource-plugin_*.deb
!!! Note "As the kernel is updated with the version from the bullseye-backports repository, it is important to restart the system:
sudo rebootAfter installation and reboot, the `iedge`` tuning profile needs to be activated:
sudo tuned-adm profile iedge -
If the network interface plugin is to be installed on the system, the following steps should be taken after running the installation script.
cd resource-management/packages sudo apt install -y ./ie-docker-network-plugin_*.deb sudo apt install -y ./ie-network-resource-plugin_*.deb -
If you want to install the GPU plugin on your system, the following steps should be taken after running the installation script.
For more information, refer to the documentation of the Resource Manager's documentation for device builders
cd resource-management/packages
sudo apt install -y ./ie-nvidia-gpu-resource-plugin_*.deb
IEDK Service Configurations Hints
This section provides some hints for configuring IEDK services.
NTP
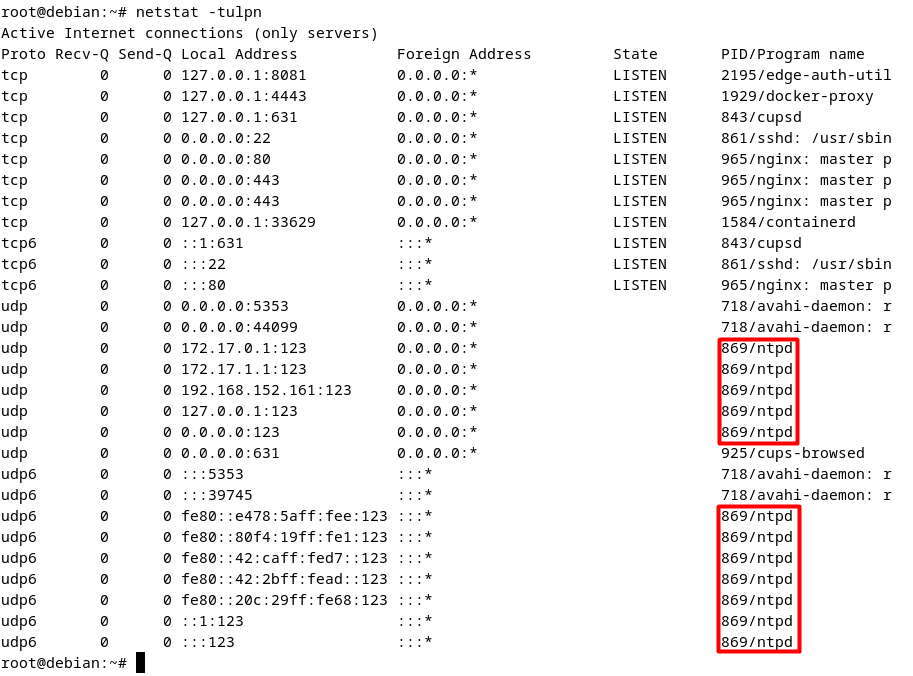
Note On some devices, UDP port 123 may not be open as an outgoing port. If this port is not open as an outgoing port, the ntpd service will not work properly, and the system time cannot be set accurately. Ensure that UDP port 123 is open as an outgoing port so that NTPD services to can use it successfully. You can check the status of this port with the following command:
```bash
netstat -tulpn
```
NetworkManager
This section contains NetworkManager related configurations. It can be skipped if the network settings are managed directly with NetworkManager.
If network settings are configured by different tool than Network Manager, NetworkManager must be enabled from within this tool in order to onboard device successfully to IEM.
Without Network Manager adjustment, there might be a problem with the device's network settings, such that the device is not onboarded due to a network-related issue, or the IP address is not showing up in the IED UI.
Examples
NetworkManager must be enabled if other tools are used except the ones below.
netplan
The netplan utility is installed by default for configuring network interfaces for Ubuntu Server installations.
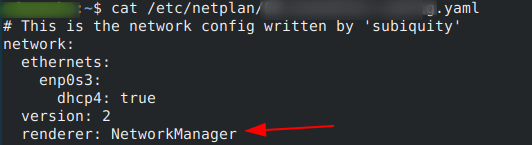
Netplan has the ability to run both systemd-networkd or NetworkManager. However, to allow the NetworkManager to manage all network devices with the help of netplan, the distinction must be stated before using it.
For that, the following setting should be applied, where renderer must be specified explicitly:
sudo netplan apply
ifupdown
/etc/NetworkManager/NetworkManager.conf
..
[ifupdown]
managed=false -> true


nmcli device set ens33 managed yes